If you’re the kind of person who loves a playful dessert with a big payoff, these Strawberry Crunch Cheesecake Tacos are about to be your new favorite. They’re crisp, golden “taco” shells filled with silky cheesecake cream and topped with juicy strawberries and a nostalgic strawberry shortcake-style crunch. They look like a bakery masterpiece but come together with simple steps and everyday ingredients.
Expect a little mess, a lot of smiles, and that irresistible balance of creamy, crunchy, and fruity.
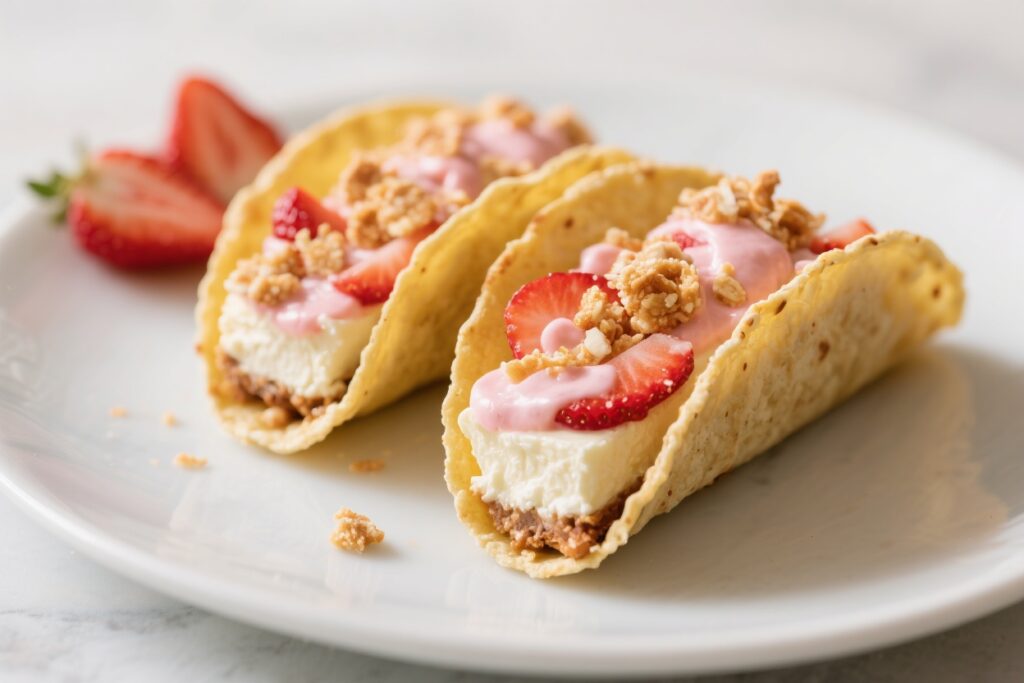
Strawberry Crunch Cheesecake Tacos
- Ingredients
For the taco shells:
- 8 small flour tortillas (street taco size, about 4–5 inches)
- 3 tablespoons unsalted butter (melted)
- 1/4 cup granulated sugar
- 1 teaspoon ground cinnamon (optional but recommended)
For the cheesecake filling:
- 12 ounces cream cheese (softened)
- 1/2 cup powdered sugar
- 1 teaspoon pure vanilla extract
- 1 cup cold heavy whipping cream
- Pinch of salt
For the strawberry crunch topping:
- 16 golden sandwich cookies (like Golden Oreos)
- 2 tablespoons freeze-dried strawberry powder (or crushed freeze-dried strawberries)
- 2 tablespoons unsalted butter (melted)
- 1 tablespoon strawberry gelatin powder (optional for color and flavor)
For the strawberry layer:
- 1 1/2 cups fresh strawberries (hulled and diced)
- 1 tablespoon granulated sugar (adjust to taste)
- 1 teaspoon lemon juice
Optional garnish:
- Melted white chocolate for drizzling
- Fresh mint leaves
Step-by-Step Instructions
- Prep the strawberries: In a small bowl, toss the diced strawberries with sugar and lemon juice.
- Let them sit for 10–15 minutes to get juicy. Set aside.
- Make the strawberry crunch: Add the sandwich cookies to a zip-top bag and crush into small crumbs with a rolling pin, or pulse in a food processor. Mix in freeze-dried strawberry powder and gelatin powder (if using).
- Stir in melted butter until the crumbs are lightly moistened and clump slightly. Set aside.
- Shape the taco shells: Preheat your oven to 375°F (190°C). Brush both sides of each tortilla with melted butter.
- Stir sugar and cinnamon together, then coat tortillas lightly on both sides.
- Bake the shells: Drape tortillas over the bars of an oven rack to form a taco shape (leave space between so air can circulate). Bake 7–9 minutes, until golden and crisp. Remove carefully and let cool completely on a wire rack so they hold their shape.
- Whip the cheesecake filling: In a bowl, beat cream cheese, powdered sugar, vanilla, and salt until smooth and fluffy.
- In a separate bowl, whip cold heavy cream to stiff peaks. Fold the whipped cream into the cream cheese mixture until silky and fully combined.
- Chill for structure: Transfer filling to a piping bag or large zip-top bag and chill for 20–30 minutes. This helps it pipe neatly and hold its shape.
- Assemble the tacos: Pipe the cheesecake filling into each cooled tortilla shell, filling generously.
- Spoon a layer of macerated strawberries on top, allowing some juices to drip for that pretty, glossy look.
- Add the crunch: Sprinkle the strawberry crunch topping over the fruit and cream. Press gently so it adheres.
- Finish with flair: Drizzle with melted white chocolate and add a small mint leaf if you like. Serve immediately for maximum crispness.
Storage Instructions
Unassembled: Store shells at room temperature in an airtight container for up to 2 days.
Keep the cheesecake filling covered in the fridge for up to 3 days. The strawberry crunch can be stored in a sealed container at room temperature for 3–4 days.
Assembled: Best eaten right away. If needed, refrigerate for up to 6 hours, but the shells will soften slightly.
Freezing: Not recommended for assembled tacos.
You can freeze the cheesecake filling for up to 1 month; thaw in the fridge and re-whip briefly if needed.

Featured Favorites
Essential Baking Tools

Must-Have Pantry Staples


Ingredients
- For the taco shells:
- 8 small flour tortillas (street taco size, about 4–5 inches)
- 3 tablespoons unsalted butter, melted
- 1/4 cup granulated sugar
- 1 teaspoon ground cinnamon (optional but recommended)
- For the cheesecake filling:
- 12 ounces cream cheese, softened
- 1/2 cup powdered sugar
- 1 teaspoon pure vanilla extract
- 1 cup cold heavy whipping cream
- Pinch of salt
- For the strawberry crunch topping:
- 16 golden sandwich cookies (like Golden Oreos)
- 2 tablespoons freeze-dried strawberry powder (or crushed freeze-dried strawberries)
- 2 tablespoons unsalted butter, melted
- 1 tablespoon strawberry gelatin powder (optional for color and flavor)
- For the strawberry layer:
- 1 1/2 cups fresh strawberries, hulled and diced
- 1 tablespoon granulated sugar (adjust to taste)
- 1 teaspoon lemon juice
- Optional garnish:
- Melted white chocolate for drizzling
- Fresh mint leaves
Step-by-Step Instructions
- Prep the strawberries: In a small bowl, toss the diced strawberries with sugar and lemon juice.
Let them sit for 10–15 minutes to get juicy. Set aside.
- Make the strawberry crunch: Add the sandwich cookies to a zip-top bag and crush into small crumbs with a rolling pin, or pulse in a food processor. Mix in freeze-dried strawberry powder and gelatin powder (if using).
Stir in melted butter until the crumbs are lightly moistened and clump slightly. Set aside.
- Shape the taco shells: Preheat your oven to 375°F (190°C). Brush both sides of each tortilla with melted butter.
Stir sugar and cinnamon together, then coat tortillas lightly on both sides.
- Bake the shells: Drape tortillas over the bars of an oven rack to form a taco shape (leave space between so air can circulate). Bake 7–9 minutes, until golden and crisp. Remove carefully and let cool completely on a wire rack so they hold their shape.
- Whip the cheesecake filling: In a bowl, beat cream cheese, powdered sugar, vanilla, and salt until smooth and fluffy.
In a separate bowl, whip cold heavy cream to stiff peaks. Fold the whipped cream into the cream cheese mixture until silky and fully combined.
- Chill for structure: Transfer filling to a piping bag or large zip-top bag and chill for 20–30 minutes. This helps it pipe neatly and hold its shape.
- Assemble the tacos: Pipe the cheesecake filling into each cooled tortilla shell, filling generously.
Spoon a layer of macerated strawberries on top, allowing some juices to drip for that pretty, glossy look.
- Add the crunch: Sprinkle the strawberry crunch topping over the fruit and cream. Press gently so it adheres.
- Finish with flair: Drizzle with melted white chocolate and add a small mint leaf if you like. Serve immediately for maximum crispness.
Storage Instructions
- Unassembled: Store shells at room temperature in an airtight container for up to 2 days.
Keep the cheesecake filling covered in the fridge for up to 3 days. The strawberry crunch can be stored in a sealed container at room temperature for 3–4 days.
- Assembled: Best eaten right away. If needed, refrigerate for up to 6 hours, but the shells will soften slightly.
- Freezing: Not recommended for assembled tacos.
You can freeze the cheesecake filling for up to 1 month; thaw in the fridge and re-whip briefly if needed.
Why This is Good for You
- Strawberries bring real fruit power: They’re loaded with vitamin C and antioxidants that support immune health.
- Built-in portion control: Each taco is a single serving, making it easier to enjoy a sweet treat without going overboard.
- Balanced textures encourage satisfaction: The mix of creamy, crunchy, and juicy helps curb cravings with less.
- Customizable sweetness: You control the sugar in the filling and berries, so it’s easy to tone it down.
What Not to Do
- Don’t skip cooling the shells: If they don’t cool fully, they’ll sag and lose that crisp taco shape.
- Don’t overhydrate the crunch: Too much butter makes it soggy. Add just enough to lightly bind the crumbs.
- Don’t assemble too early: Moisture from the filling and berries softens the shells. Assemble close to serving time.
- Don’t use warm filling: Chill it first for clean piping and better structure.
- Don’t make the strawberry pieces too large: Smaller dice sit better in the shells and are easier to eat.
Alternatives
- Shell swaps: Use cinnamon-sugar waffle cones, baked wonton wrappers, or graham cracker taco shells for a twist.
- Fruit variations: Try raspberries, blueberries, peaches, or a mixed berry combo.
Frozen fruit works if well thawed and drained.
- Crunch options: Substitute crushed graham crackers, vanilla wafers, shortbread cookies, or almond biscotti. Add a bit of freeze-dried fruit powder for color and flavor.
- No-gelatin version: Skip the gelatin powder and use only freeze-dried strawberries for a natural pink hue.
- Lighter filling: Swap part of the cream cheese for Greek yogurt (drain it for thickness). Sweeten to taste with honey or reduced sugar.
- Dairy-free: Use dairy-free cream cheese and coconut whipping cream.
Brush tortillas with plant butter.
- Chocolate lovers: Add cocoa to the cheesecake filling, or drizzle dark chocolate over the top.
FAQ
How do I keep the taco shells from collapsing in the oven?
Let the tortillas hang over oven rack bars with space between them, and avoid overcrowding. Bake until lightly browned and firm, then cool completely on a rack to set the shape.
Can I make the shells with corn tortillas?
Corn tortillas are more brittle and can crack. Flour tortillas hold their shape better for dessert tacos, especially the small, soft street-taco size.
What if I don’t have freeze-dried strawberry powder?
Crush whole freeze-dried strawberries into a powder using a bag and rolling pin.
In a pinch, you can skip it and rely on the gelatin powder for flavor and color, or just use cookie crumbs for a vanilla crunch.
How sweet is the cheesecake filling?
It’s lightly sweet and creamy. If you prefer a richer dessert, add up to 2/3 cup powdered sugar, tasting as you go.
Can I assemble these a few hours before serving?
Yes, but expect some softening. For crisp shells, keep the components separate and assemble within 30 minutes of serving.
What’s the best way to pipe the filling neatly?
Use a large round or star tip in a piping bag, and chill the filling first.
A zip-top bag with a snipped corner also works in a pinch.
How can I make them gluten-free?
Use gluten-free flour tortillas or gluten-free waffle cones as shells. Choose gluten-free cookies for the crunch topping.
Can I reduce the sugar?
Yes. Cut the sugar in the filling, skip the gelatin powder, and sweeten the strawberries lightly or not at all if they’re very ripe.
How many tacos does this make?
About 8 small tacos, depending on how generously you fill them.
Double the recipe for a party tray.
Can I add a sauce?
Absolutely. A quick strawberry sauce or a simple drizzle of melted white or dark chocolate adds a nice finish.
In Conclusion
These Strawberry Crunch Cheesecake Tacos are a playful, eye-catching dessert that tastes as amazing as it looks. With crisp shells, creamy filling, bright berries, and a nostalgic crunch, every bite is a little celebration.
They’re easy to customize, simple to prep ahead, and guaranteed to impress. Keep the components ready, assemble right before serving, and watch them disappear.
📌Related Read
15 Puff Pastry Dessert Recipes That Look Fancy but Are Easy
10 Phyllo Dough Dessert Recipes Worth the Effort
12 Italian Dessert Recipes You Can Make at Home
10 Japanese Dessert Recipes That Are Light & Elegant
Soft, Fluffy Cinnamon Rolls Just Like a Bakery Makes