Ice cream cake is the ultimate birthday treat that combines the best of both worlds: cake and ice cream. This Ice Cream Cake DIY for Birthdays That Looks Bakery Made is not only visually stunning but also incredibly delicious. With layers of your favorite ice cream, cake, and toppings, you can create a show-stopping dessert that will impress your guests and make any birthday celebration unforgettable. The best part? You can customize it to suit your taste and dietary preferences, making it a versatile option for everyone.
Why This Recipe Works
This recipe works because it combines the rich, creamy texture of ice cream with the light, fluffy nature of cake. The contrast between the two creates a delightful mouthfeel that is both satisfying and refreshing. By using high-quality ingredients and layering them thoughtfully, you can achieve a bakery-style finish that looks as good as it tastes. Plus, the ability to customize flavors and toppings means that you can cater to any palate, making it a perfect choice for birthday celebrations.
Ingredients
Main Protein
While ice cream and cake are the stars of this dessert, the main protein here is the cake itself. A classic vanilla or chocolate cake serves as the foundation, providing structure and a base for the ice cream layers. You can also opt for a sponge cake or a gluten-free cake if you have dietary restrictions.
Sauce or Flavor Base
To elevate the flavor profile, consider adding a layer of chocolate or caramel sauce between the cake and ice cream layers. This not only adds richness but also enhances the overall taste experience. You can also use fruit purees or flavored syrups to complement the ice cream and cake flavors.
Seasonings
A pinch of salt can enhance the sweetness of the ice cream and cake, balancing the flavors beautifully. Additionally, vanilla extract in the cake batter adds depth and warmth, making every bite more enjoyable.
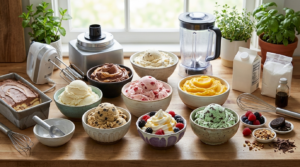
The Star Ingredient
The star ingredient of this ice cream cake is, of course, the ice cream. Choose your favorite flavors—whether it’s classic chocolate, refreshing mint, or fruity strawberry—to create layers that will delight your taste buds. The key is to use high-quality ice cream that has a smooth texture and rich flavor. You can even mix and match flavors for a fun twist!
Variations & Adaptations
This ice cream cake is highly adaptable. You can switch up the cake flavor to match the ice cream, such as pairing a chocolate cake with cookies and cream ice cream. For a healthier option, consider using yogurt or sorbet instead of traditional ice cream. You can also add layers of fresh fruit, nuts, or even cookie crumbles for added texture and flavor.
How to Make Ice Cream Cake DIY for Birthdays That Looks Bakery Made
- Start by baking your cake according to the recipe or box instructions. Allow it to cool completely before assembling the ice cream cake.
- Once the cake is cool, slice it in half horizontally to create two layers.
- Place one layer of cake on a serving plate and spread a layer of your chosen ice cream on top, smoothing it out evenly.
- Add a layer of sauce or flavor base over the ice cream, then place the second layer of cake on top.
- Repeat the process with another layer of ice cream and sauce, if desired, before finishing with a final layer of cake.
- Cover the entire cake with a layer of whipped cream or frosting for a polished look.
- Decorate with sprinkles, chocolate shavings, or fresh fruit to make it visually appealing.
- Freeze the cake for at least 4 hours or until firm before serving.
What to Serve With It
This ice cream cake pairs beautifully with a variety of accompaniments. Consider serving it with a drizzle of warm chocolate or caramel sauce for an indulgent touch. Fresh berries or a scoop of sorbet can add a refreshing contrast to the richness of the cake. For a fun twist, serve it alongside a glass of milk or a scoop of your favorite ice cream flavor.
Storage & Reheating
Store any leftover ice cream cake in the freezer, tightly wrapped in plastic wrap or aluminum foil to prevent freezer burn. It can last for up to a week, but it’s best enjoyed fresh. There’s no need to reheat; simply slice and serve straight from the freezer for the best texture.
FAQ
Can I use store-bought cake?
Absolutely! Using a store-bought cake can save you time and still yield delicious results. Just make sure to choose a flavor that complements your ice cream.
How long does it take to freeze the cake?
For optimal firmness, freeze the cake for at least 4 hours. If you can, overnight is even better to ensure it holds its shape when sliced.
Recipe Card
Recipe Name: Ice Cream Cake DIY for Birthdays That Looks Bakery Made
Author: Your Name
Course: Dessert
Cuisine: American
Servings: 10
Prep Time: 30 minutes
Cook Time: 30 minutes
Total Time: 4 hours (including freezing time)
Ingredients
- 1 cake mix (or homemade cake recipe, about 450g / 16oz)
- 2 pints of your favorite ice cream (about 900ml / 32oz)
- 1 cup of chocolate or caramel sauce (about 240ml / 8oz)
- 1 cup of whipped cream or frosting (about 240ml / 8oz)
- Sprinkles or toppings of choice
Instructions
ABBREVIATED VERSION
Bake the cake, cool, slice, and layer with ice cream and sauce. Freeze until firm, then decorate and serve.
FULL VERSION
1. Start by baking your cake according to the recipe or box instructions. Allow it to cool completely before assembling the ice cream cake.
2. Once the cake is cool, slice it in half horizontally to create two layers.
3. Place one layer of cake on a serving plate and spread a layer of your chosen ice cream on top, smoothing it out evenly.
4. Add a layer of sauce or flavor base over the ice cream, then place the second layer of cake on top.
5. Repeat the process with another layer of ice cream and sauce, if desired, before finishing with a final layer of cake.
6. Cover the entire cake with a layer of whipped cream or frosting for a polished look.
7. Decorate with sprinkles, chocolate shavings, or fresh fruit to make it visually appealing.
8. Freeze the cake for at least 4 hours or until firm before serving.
Recipe Notes
- Substitutions: Use gluten-free cake mix or dairy-free ice cream for dietary needs.
- Variations: Experiment with different cake and ice cream flavors.
- Storage: Keep in the freezer, wrapped tightly.
- Make-ahead: Can be made a day in advance.
- Reheating: No reheating needed; serve frozen.
- Common mistakes: Ensure the cake is completely cool before layering to prevent melting the ice cream.