
Reese’s Spider Cookies: The Easiest Spooky Halloween Treat (Ready in 30 Minutes)
Chewy golden peanut butter cookies with a mini peanut butter cup pressed into the center, eight piped chocolate legs and candy eyes. No chilling, no decorating skill, and kids and adults go wild for them.
- 6 ingredients
- Naturally gluten-free
- Scales to 72
- Printable recipe
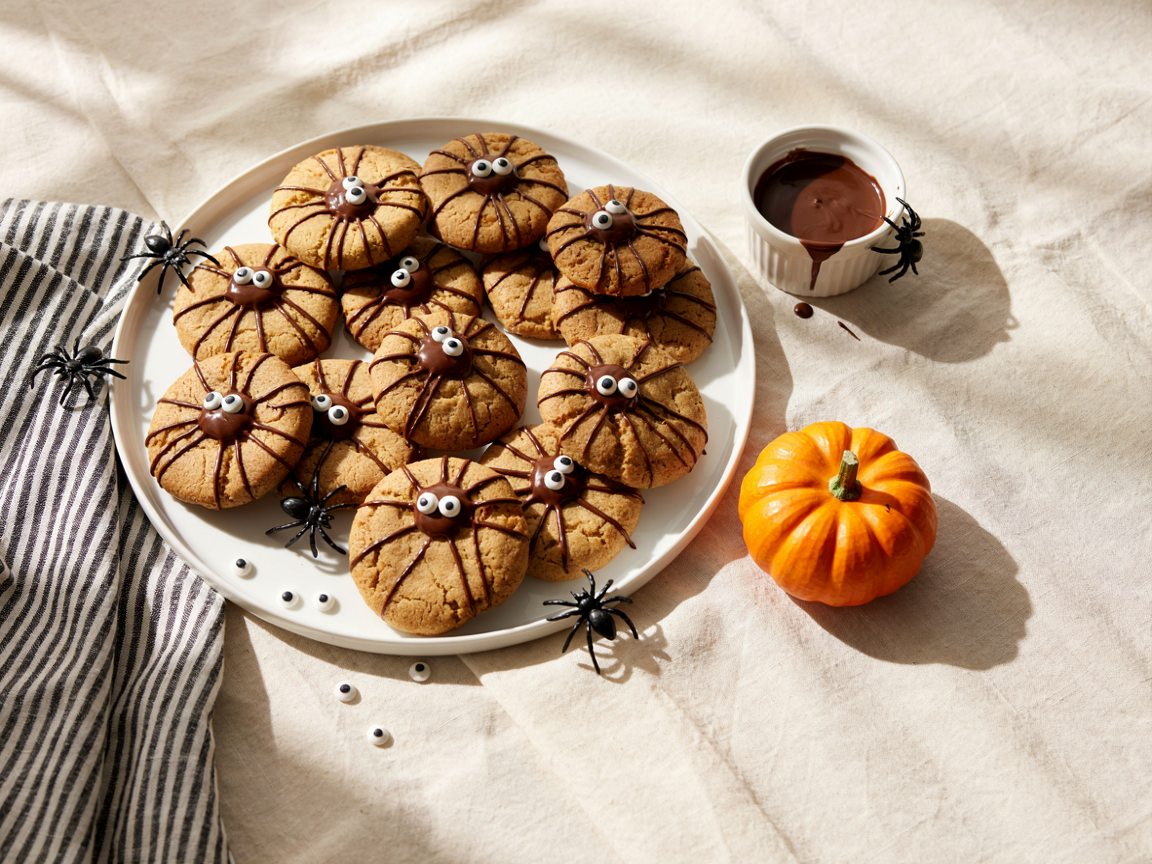
A platter of spider cookies: peanut butter cup bodies, piped chocolate legs and candy eyes on chewy golden cookies.
Reese’s spider cookies are the Halloween treat that looks like it took an afternoon and actually took the time it takes to preheat the oven. The cookie is a six-ingredient flourless peanut butter dough that bakes chewy and golden, a frozen mini peanut butter cup goes into the hot center for the body, and eight wobbly piped chocolate legs and two candy eyes turn it into a spider. Any brand of peanut butter cup works; the classic ones are what the pin shows.
Below is the full scaling recipe, the one timing trick that keeps the cups from melting, how to pipe legs that look like legs, six variations including a nut-free version for school, storage and freezing, party and bake-sale ideas, and the answers to every question about spider cookies.
Why Spider Cookies Are the Easiest Spooky Halloween Treat
Halloween baking usually means cutters, royal icing and a ruined afternoon. These skip all of it:
Under 30 minutes
Ten minutes to mix and scoop, ten to bake, ten to decorate. Faster than a cake mix, and they look like they came from a bakery.
Six ingredients, no flour
Peanut butter, sugar, egg, vanilla, baking soda, salt. The dough is naturally gluten-free and the cookie bakes chewy and golden every time.
Kids decorate
Pressing in the cups, piping wobbly legs and sticking on eyes is the fun part. Wobbly legs look more like spiders, so nobody can get it wrong.
They travel
Sturdy, not sticky and fine at room temperature for days. The right cookie for a class party, a bake sale or a treat box.
What You Need for Reese’s Spider Cookies
Six ingredients for the cookie, three for the spider. Notes on the ones that decide how they turn out:
Peanut butter
Regular creamy peanut butter, the kind that does not separate. Natural peanut butter spreads flat and greasy in a flourless dough. Crunchy works if you like texture.
Granulated sugar
The only structure in a flourless cookie comes from sugar and egg, so keep the full amount. Swap in half brown sugar for a softer, more caramel cookie.
Egg
One large egg binds a 24-cookie batch. For 36 cookies, beat 2 eggs and hold back a tablespoon so the dough does not go cakey.
Baking soda
A half teaspoon lifts the cookie just enough to crack on top. More and it spreads too thin to hold the cup.
Mini peanut butter cups
The spider body. Freeze them for 15 minutes first so they keep their shape when pressed into a hot cookie. Any brand works; the classic ones are what the pin shows.
Chocolate for the legs
Dark chocolate chips thinned with a little coconut oil pipe cleanly and set firm. Black candy melts give inkier legs if you want more contrast.
Candy eyes
Small round ones, two per spider. No candy eyes? A dot of white chocolate with a mini chocolate chip pressed into it does the job.
Reese’s Spider Cookies Recipe
The recipe makes 24 cookies by default. Tap a batch size to scale it; the dough, the toppings and the printable card all update together.
Peanut Butter Cup Spider Cookies
Chewy, golden flourless peanut butter cookies with a mini peanut butter cup pressed into the warm center, eight piped chocolate legs and candy eyes. Six ingredients plus the toppings, under 30 minutes of work. Tap a batch size and every amount updates, including the printable card.
How many cookies?
Ingredients
For the peanut butter cookies- 1 cup (250 g)1½ cups (375 g)2 cups (500 g)3 cups (750 g) creamy peanut butter (regular, not natural)
- 1 cup (200 g)1½ cups (300 g)2 cups (400 g)3 cups (600 g) granulated sugar
- 12 (reserve 1 tbsp)23 large eggs
- 1 tsp1½ tsp2 tsp1 tbsp vanilla extract, or alcohol-free vanilla
- ½ tsp¾ tsp1 tsp1½ tsp baking soda
- ¼ tspa heaped ¼ tsp½ tsp¾ tsp fine salt
- 24364872 mini peanut butter cups, unwrapped and frozen
- ½ cup (90 g)¾ cup (135 g)1 cup (180 g)1½ cups (270 g) dark chocolate chips, for the legs
- ½ tsp¾ tsp1 tsp1½ tsp coconut oil, for the legs
- 487296144 candy eyes
Naturally gluten-free: there is no flour in the dough. Check that the peanut butter cups and candy eyes are gluten-free too if it matters for a guest.
Instructions
Freeze the cups and heat the oven
Unwrap the mini peanut butter cups and put them in the freezer. Heat the oven to 350 degrees F (175 C) and line two baking sheets with parchment.
Mix the dough
Stir the peanut butter, sugar, egg, vanilla, baking soda and salt in a bowl until smooth and glossy. It will look greasy at first and come together after a minute of stirring.
Scoop
Roll level tablespoons of dough into balls and set them 2 inches apart on the sheets. Do not flatten; they spread into perfect rounds on their own.
Bake
Bake for 9 to 11 minutes, until the edges are set and golden and the centers still look slightly underdone. They firm up as they cool.
Press the cups in
The moment the sheet comes out, press one frozen peanut butter cup into the center of each hot cookie, flat side down, until the cookie cracks gently around it. Leave the cookies on the sheet for 20 minutes to cool completely.
Pipe the legs
Melt the chocolate chips with the coconut oil in 20-second bursts, stirring between each, and spoon into a piping bag or a zip-top bag with the very tip snipped. Pipe four legs on each side of the cup, each one curving out from the cup with a small bend for the knee.
Add the eyes
Dab a dot of melted chocolate on the front of each cup and press two candy eyes into it. Let the chocolate set for 15 minutes at room temperature, or 5 minutes in the fridge.
The Timing Trick That Keeps the Peanut Butter Cups Whole
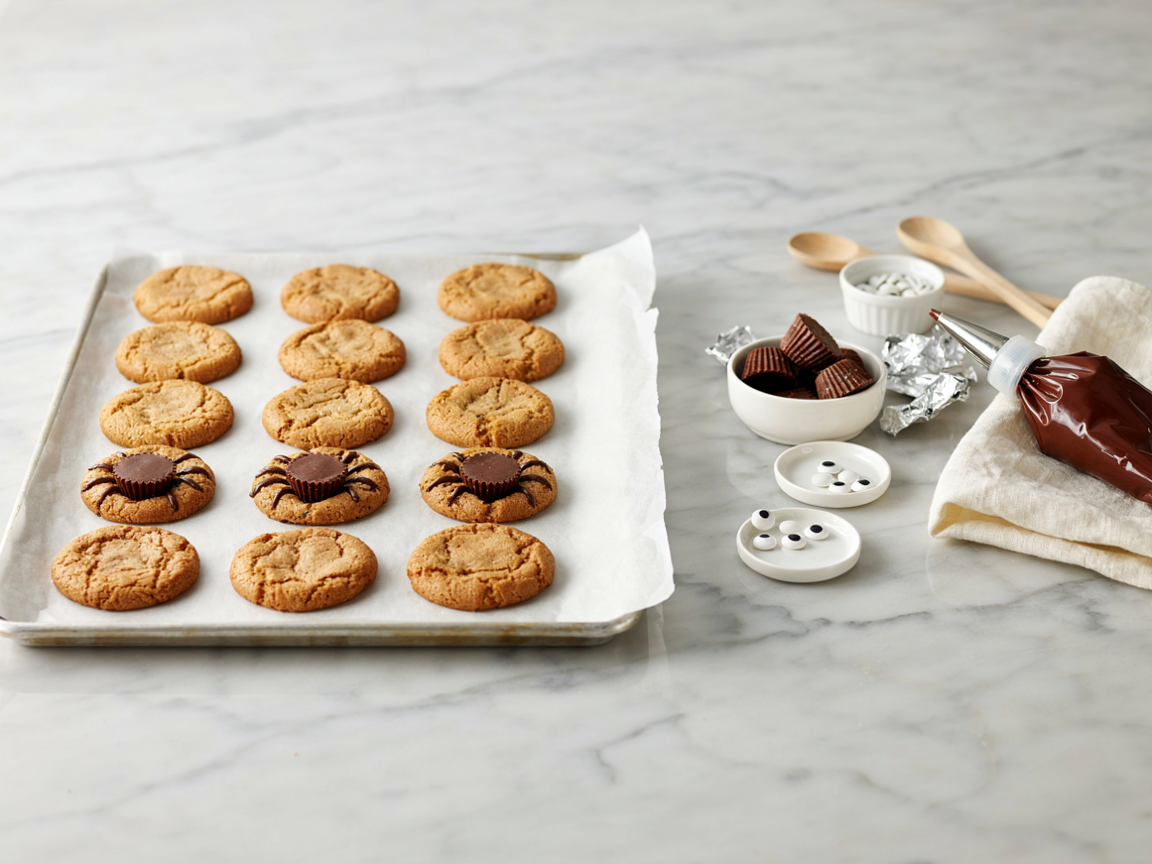
Frozen peanut butter cups pressed into the hot cookies straight from the oven, then cooled before the legs go on.
Every spider cookie that went wrong went wrong at the same moment: the cup. Four rules fix it for good:
Freeze the cups first
A room-temperature cup melts into a puddle on a hot cookie. Frozen, it holds its ridged shape and only its base softens, which is what glues it to the cookie.
Press within 30 seconds
The cookie is soft enough to take the cup only while it is hot from the oven. Line up the cups beside the oven before the timer goes.
Cool completely before the legs
Warm chocolate on a warm cookie runs. Twenty minutes on the sheet, then pipe. The cup firms back up in that time too.
Glue the eyes
Candy eyes slide off a dry cup. A dot of melted chocolate behind each one keeps them in place through a car ride.
How to Pipe Spider Legs That Look Like Legs
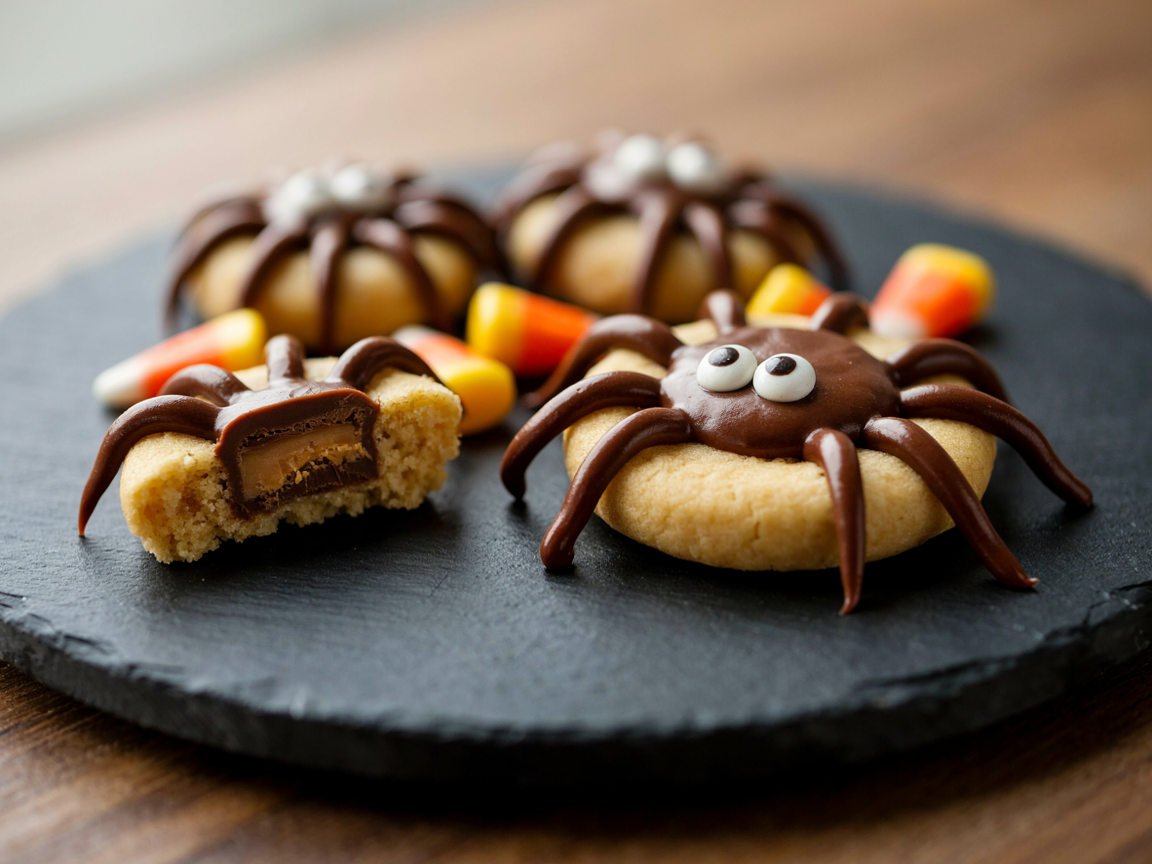
Eight thin legs with a bend at the knee, and two candy eyes glued on with a dot of chocolate.
The legs are the whole personality of the cookie, and they take three habits:
Make a fine tip
Snip the very corner of a zip-top bag, no more than an eighth of an inch. Thin legs look spidery; thick legs look like a flower.
Four each side, with a knee
Start at the edge of the cup and pipe outward, pausing once to change direction so each leg has a bend. Four on the left, four on the right.
Wobble on purpose
Slightly uneven, slightly curved legs read as a spider from across the room. Perfectly straight ones look like a sun.
Chocolate too thick to pipe? Add a quarter teaspoon more coconut oil and stir. Too thin and running? Let it sit for 2 minutes; it thickens as it cools. The right consistency holds a line but flows off the tip without squeezing hard.
Six Ways to Change Up Spider Cookies
Same spider, different cookie. Tap a tab:
Classic peanut butter (the recipe above)
Flourless peanut butter cookies, a mini peanut butter cup, dark chocolate legs and candy eyes. The version on the pin, and the one that disappears first at a bake sale.
Double chocolate spider
Stir 3 tablespoons of cocoa powder into the dough with the sugar for a dark cookie that hides the legs until you look closely. Pipe the legs in white chocolate instead for a spider that stands out.
Nut-free for school
Swap the peanut butter for the same amount of sunflower seed butter and the peanut butter cups for chocolate-covered caramels or a large chocolate kiss. The dough bakes a little darker and just as chewy. Check the candy eyes for allergen labels.
Pretzel legs, no piping
Break thin pretzel sticks into 1-inch pieces and push four into each side of the cup while the cookie is still warm. Salty, crunchy and no piping bag; see our cookie spiders with pretzel legs for the no-bake version.
Bite-size spiders
Roll teaspoon-size balls, bake 7 to 8 minutes and press a chocolate chip into each for the body. Tiny legs, tiny eyes, and a tray of fifty for a classroom.
Caramel-bodied spider
Use a chocolate-covered caramel candy instead of the peanut butter cup. It presses in the same way, and the chewy caramel center is the favorite with teenagers.
How to Store Spider Cookies (and Make Them Ahead)
These are sturdier than most decorated cookies, which is why they suit parties and bake sales. Keep them like this:
| Stage | How | How long |
|---|---|---|
| StageRaw dough | HowCovered, in the fridge | How longUp to 3 days |
| StageRaw dough balls | HowFreezer bag | How longUp to 2 months; bake from frozen, add 1 minute |
| StageBaked, with cups, no legs | HowAirtight at room temperature | How longUp to 5 days |
| StageFully decorated | HowAirtight at room temperature, single layer | How longUp to 5 days; best in 3 |
| StageFully decorated, frozen | HowAirtight, layers separated by parchment | How longUp to 2 months; thaw uncovered |
Make-Ahead Timeline
Bake the cookies and press in the cups up to 5 days ahead, then pipe the legs and glue the eyes the day you serve them. Or freeze the dough balls weeks ahead and bake from frozen, adding one minute, on Halloween morning.
Spider Cookies for Class Parties, Bake Sales and Treat Boxes
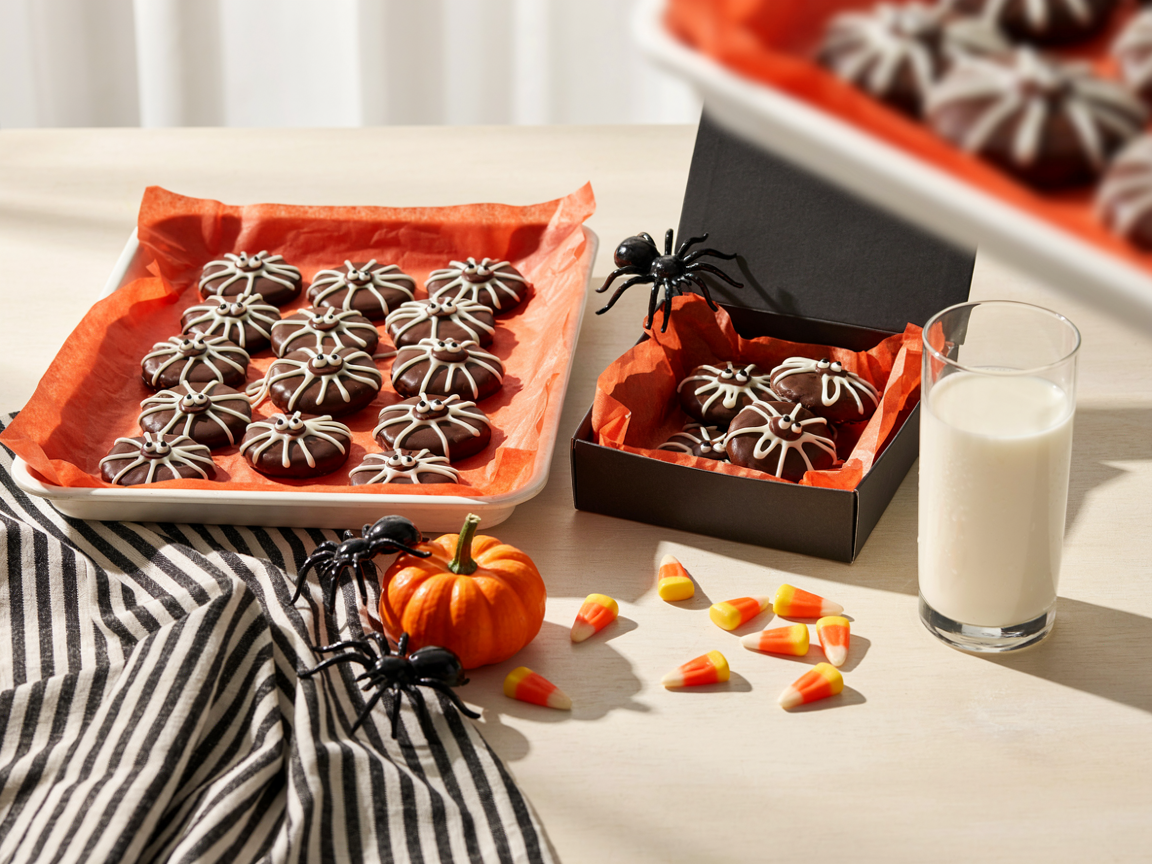
Spider cookies packed in a parchment-lined tray and a treat box, ready for the party.
Class party
Pack them in a single layer in a lidded tray lined with orange parchment. For a nut-free classroom, bake the nut-free version. Our Halloween classroom snacks post has more ideas for the whole class.
Bake sale
Bag them in threes in clear cellophane with a twist of black ribbon. They hold up for days, which most bake-sale treats do not. See our Halloween bake sale treats.
Treat boxes
Six spiders in a black bakery box on a square of parchment, with a few candy corn in the corners, make a gift that costs almost nothing.
The party table
A white platter, the spiders in loose rows and a few plastic spiders crawling off the edge. Put them next to the skull cake truffles and let the kids choose.
How Many Spider Cookies for a Crowd
Plan on 2 per person at a family party and 1 each with spares for a classroom. Each row matches a batch size on the recipe card:
| The occasion | Batch size | What it covers |
|---|---|---|
| The occasionA family or a small class | Batch size24 cookies | What it covers2 each for 12 |
| The occasionA classroom of 25 | Batch size36 cookies | What it coversOne each with spares |
| The occasionA party or a bake sale | Batch size48 cookies | What it coversTwo sheets, two rounds |
| The occasionA big event | Batch size72 cookies | What it coversBag in threes |
Troubleshooting Spider Cookies
| Problem | Likely cause | Fix |
|---|---|---|
| ProblemCookies spread flat and greasy | Likely causeNatural peanut butter, or warm dough | FixUse regular creamy peanut butter; chill the dough 15 minutes |
| ProblemCups melted into puddles | Likely causeNot frozen, or pressed too late | FixFreeze 15 minutes; press within 30 seconds of the oven |
| ProblemCookie cracked in half | Likely causePressed after it cooled | FixPress while hot; a gentle crack around the cup is fine |
| ProblemLegs ran and spread | Likely causeChocolate too hot or too thin | FixLet it cool 2 minutes; use less coconut oil |
| ProblemEyes fell off | Likely causeNo chocolate glue | FixDab melted chocolate behind each eye |
| ProblemCookies dry and crumbly | Likely causeOverbaked | FixPull at 9 to 10 minutes while the centers look soft |
Nutrition (approximate, per cookie)
Estimates for one decorated cookie from a 24-cookie batch. Gluten-free as written (check the candy labels); contains peanuts, so use the nut-free variation for school.
Reese’s Spider Cookies: FAQs
What are Reese’s spider cookies?
They are chewy peanut butter cookies with a mini chocolate peanut butter cup pressed into the warm center for the spider body, eight thin chocolate legs piped outward onto the cookie, and two candy eyes. They take under 30 minutes and need no flour.
Do I have to freeze the peanut butter cups?
Yes, for 15 minutes at least. A frozen cup keeps its ridged shape when pressed into a hot cookie, and only its base softens enough to stick. A room-temperature cup melts into a puddle and the spider loses its body.
Why do the cookies have no flour?
Peanut butter, sugar and egg make a dough that holds together and bakes chewy on their own. Skipping the flour keeps the cookies naturally gluten-free and gives a denser, more peanut-buttery cookie that holds the cup better than a cakey one.
Can I use natural peanut butter?
It is not recommended. Natural peanut butter separates and makes a flourless dough spread thin and greasy. Use regular creamy peanut butter that does not need stirring; crunchy is fine too.
How do I pipe the spider legs without a piping bag?
Spoon the melted chocolate into a small zip-top bag, push it into one corner and snip off the very tip. Pipe four legs on each side of the cup, pausing once in each leg to give it a bend. Thin pretzel sticks pushed into the warm cup are the no-piping alternative.
Can I make spider cookies ahead of time?
Yes. The raw dough keeps for 3 days in the fridge and the dough balls freeze for 2 months. Baked cookies with the cups pressed in keep for 5 days airtight, so bake them early and add the legs and eyes the day you serve them for the sharpest look.
How long do spider cookies last?
Fully decorated cookies keep for up to 5 days in an airtight container at room temperature, stored in a single layer so the legs do not smudge. They are at their chewiest in the first 3 days.
Can I freeze the decorated cookies?
Yes, for up to 2 months in an airtight container with parchment between the layers. Thaw them uncovered at room temperature so condensation does not fog the chocolate.
How do I make spider cookies nut-free for school?
Swap the peanut butter for the same amount of sunflower seed butter and replace the peanut butter cups with chocolate-covered caramels or a large chocolate kiss. Check the candy eyes and chocolate chips for allergen warnings on the label.
Why did my cookies spread flat?
Usually natural peanut butter or dough that was warm from a hot kitchen. Regular creamy peanut butter and 15 minutes of chilling fix it. Too much baking soda also thins the cookie, so measure the half teaspoon level.
How many spider cookies do I need for a party?
Plan on 2 per person for a family gathering or small class, and 1 each with spares for a classroom of 25. A 48-cookie batch covers a party or a bake-sale table; it bakes in two rounds on two sheets.
Are the cookies gluten-free?
The dough is, since it has no flour. Check the labels on the peanut butter cups, chocolate chips and candy eyes, which are usually gluten-free but can vary by brand, and bake on clean sheets if you are serving a guest with celiac disease.
Save the pin so the recipe is ready for Halloween.
More Spooky Halloween Treats
Truffles, snack mix, savory bites and boards for the rest of the party.
Easy Skull Cake Truffles
White chocolate skulls with stitched faces. See the truffles → Snack MixSweet and Salty Halloween Snack Mix
No-bake caramel cereal, pretzels and candy corn. Make the mix → Savory SnackSpooky Marble Deviled Eggs
Violet marbled whites with an avocado filling. Make the eggs → Party BoardWitch Hat Charcuterie Board
A cheese witch hat for the center of the table. Build the board → No-BakeCookie Spiders with Pretzel Legs
The five-minute spider for little kids. Make them → SavorySpider Crackers Halloween Snacks
The cracker-and-pretzel spider. See the snack →Freeze the cups, press them into hot cookies, cool completely, pipe eight wobbly legs and glue on the eyes. That is the entire method, and it is the easiest spooky Halloween treat you will make all season.
Pin these Reese’s spider cookies so they are ready for the class party, the bake sale and Halloween night.

