
Royal Icing Recipe: The Only Decorating Guide You Will Ever Need
A three-ingredient meringue powder royal icing that pipes clean outlines, floods glass-smooth and dries hard enough to stack, plus the consistency guide that takes it from stiff peaks to 10-second flood for every cookie you will ever decorate.
- No raw eggs
- 4 consistencies explained
- Scales to 48 cookies
- Printable recipe
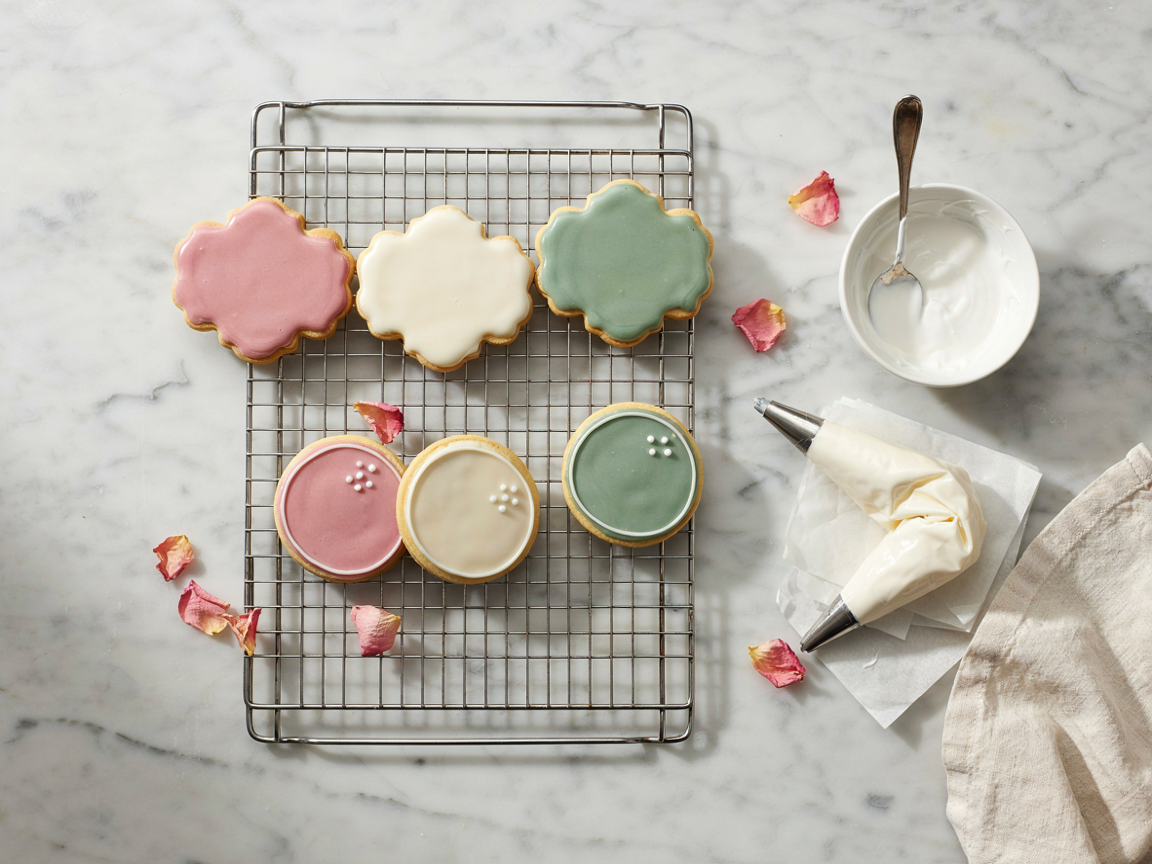
Sugar cookies flooded in pink, cream and sage royal icing, drying on a rack.
Every bakery-perfect decorated cookie starts with the same thing: a royal icing recipe that behaves. Not one that cracks, bleeds or stays tacky for two days, but one that whips up glossy, thins down predictably and dries hard. This one is three core ingredients, five minutes in the mixer and a set of simple water ratios that turn a single bowl of stiff icing into outline icing, 15-second flood and 10-second flood.
Below is the full scaling recipe, the consistency guide with the tests for each stage, how to outline, flood and add details, six base and flavor variations including egg white, aquafaba and no-meringue-powder versions, a color guide, drying and storage times, a troubleshooting table and the answers to every question about royal icing.
Why This Royal Icing Recipe Works Every Time
Royal icing has a reputation for being fussy. It is not; it is just sensitive to water. Fix the ratios and it does the same thing every time:
One base, every consistency
Beat it stiff once, then thin it down with water for each job: stiff for flowers, medium for outlines, flood for filling. No second recipe.
No raw eggs
Meringue powder gives the same glossy set as egg whites with none of the food-safety worry, and it is shelf-stable, so it is always in the cupboard.
Dries hard and glossy
Set cookies stack, bag and ship. A teaspoon of corn syrup keeps the bite soft under the shell instead of chalky.
Behaves the same every time
Three ingredients in fixed ratios. Once you know the 10-second flood test, the icing stops being the variable and the decorating gets fun.
What You Need for Royal Icing
Three core ingredients, two optional ones, and a few notes that save a batch:
Meringue powder
Dried, pasteurized egg white with a little cornstarch. It whips into a stable, glossy icing and sets hard. Find it in the baking aisle or any cake-decorating shop; it keeps for a year.
Powdered sugar
Sift it. One lump clogs a number 2 tip and ruins an outline. Confectioners’ sugar with cornstarch is correct; do not use granulated or superfine.
Warm water
Warm, not hot, dissolves the sugar faster. Add it by the half-teaspoon when thinning; a quarter teaspoon changes the consistency more than you expect.
Extract
Clear vanilla or alcohol-free vanilla keeps the icing white; brown vanilla tints it ivory. Clear almond extract is the classic bakery flavor.
Corn syrup
Optional. A teaspoon per 4 cups of sugar gives a soft sheen and a softer bite without slowing the set. Skip it for the hardest, matte finish.
Gel food coloring
Gel, never liquid. Liquid coloring thins the icing and never reaches deep reds and blacks. A toothpick dipped in gel colors a cup of icing.
Royal Icing Recipe with Meringue Powder
The recipe makes enough for 24 cookies by default. Tap a batch size and every amount updates, including the printable card.
Royal Icing Recipe (Meringue Powder)
Bright white, glossy royal icing that pipes clean outlines, floods smooth and dries hard enough to stack. Three core ingredients and five minutes in the mixer. Tap a batch size and every amount updates, including the printable card.
How many cookies?
Ingredients
- 2 cups (240 g)4 cups (480 g)6 cups (720 g)8 cups (960 g) powdered sugar, sifted
- 1½ tbsp3 tbsp4½ tbsp6 tbsp meringue powder
- 3–4 tbsp6–8 tbsp9–12 tbsp¾–1 cup warm water, plus more to thin
- ¼ tsp½ tsp¾ tsp1 tsp clear vanilla extract, alcohol-free vanilla or clear almond extract
- ½ tsp1 tsp1½ tsp2 tsp light corn syrup (optional, for shine and a softer bite)
- as needed gel food coloring
Batch notes: the 24-cookie batch covers two dozen 3-inch cookies with an outline, a flood and simple details. Make the 48-cookie batch in two rounds unless the mixer bowl holds 6 quarts or more.
Instructions
Combine the dry ingredients
Sift the powdered sugar into the bowl of a stand mixer, add the meringue powder and whisk them together by hand for a few seconds so the meringue powder is evenly distributed.
Add the liquid
Add the smaller amount of warm water, the extract and the corn syrup. Mix on low with the paddle or whisk attachment for 1 minute, until no dry sugar remains.
Beat to stiff peaks
Turn the mixer to medium-high and beat for 4 to 5 minutes, until the icing is thick, bright white and glossy and holds a stiff peak when the beater is lifted. This is stiff consistency, the base for everything else.
Divide and color
Spoon the icing into small bowls, one per color, and tint with gel food coloring, stirring slowly to avoid air bubbles. Cover every bowl with a damp cloth or plastic wrap pressed onto the surface.
Thin to the job
For outlines and details, stir in water half a teaspoon at a time until a lifted spoon leaves a soft peak that curls over. For flood icing, keep adding water until a line drawn through the surface with a knife disappears in 10 to 15 seconds.
Outline and flood
Pipe the outline with a number 2 tip and let it set for 5 minutes. Flood the center with a squeeze bottle or a bag with the tip snipped, nudge the icing into the corners with a scribe tool or toothpick and pop any bubbles.
Dry
Leave the cookies uncovered at room temperature. They are touch-dry in about an hour, set in 6 to 8 hours and ready to stack or bag after 24 hours.
The Royal Icing Consistency Guide: Stiff Peaks to 10-Second Flood
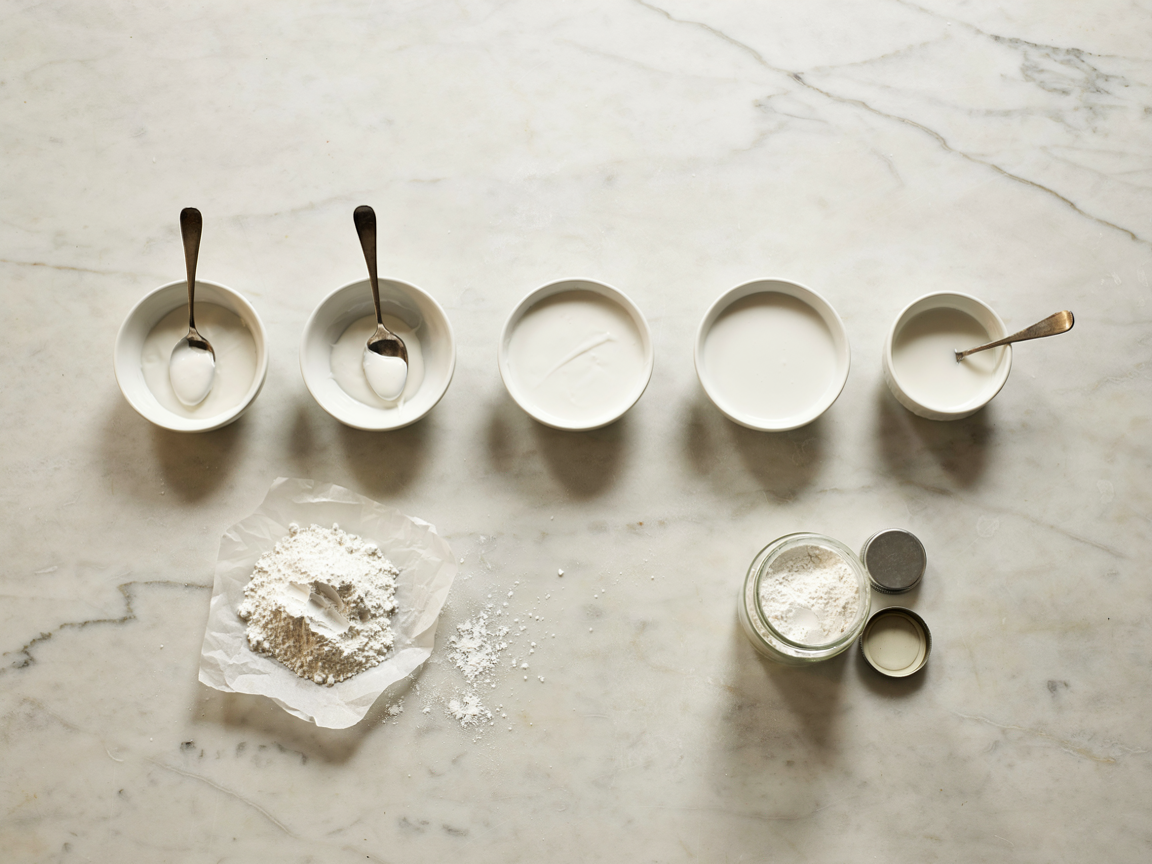
The same batch at four consistencies: stiff, medium, 15-second flood and 10-second flood.
Every job on a cookie needs a different thickness, and all of them come from the stiff base by adding water. Use this table and the tests in it; the water amounts are per cup of stiff icing:
| Consistency | Use it for | The test | Water to add | Tip |
|---|---|---|---|---|
| ConsistencyStiff | Use it forFlowers, leaves, borders, gluing gingerbread houses | The testA peak stands straight up | Water to addNone: straight from the mixer | TipStar or petal tips |
| ConsistencyMedium (piping) | Use it forOutlines, lettering, fine details | The testA peak curls over softly | Water to add½ tsp at a time, about 1 tsp per cup | Tip#1, #2 or #3 round |
| Consistency15-second flood | Use it forFlooding small cookies and detailed shapes | The testA knife line disappears in 15 seconds | Water to addAbout 2 tsp per cup | TipSqueeze bottle or #3 tip |
| Consistency10-second flood | Use it forFlooding large cookies, wet-on-wet designs | The testA knife line disappears in 10 seconds | Water to addAbout 1 tbsp per cup | TipSqueeze bottle |
Thin slowly, and never on high speed. Add water half a teaspoon at a time and stir by hand or on the lowest speed. Whipping thinned icing fills it with air that becomes bubbles and craters on the cookie. If you overshoot, stir in a spoonful of sifted sugar.
How to Decorate Cookies with Royal Icing

Outline, flood, wet-on-wet dots and piped details on a set of sugar cookies.
Four stages, in this order, and the cookies look like they came from a bakery box:
Outline first
Medium icing in a bag with a number 2 tip. Hold the tip just above the cookie and let the icing fall into place rather than dragging it. Let the outline set 5 minutes so it holds the flood.
Flood the center
Fill in with 10- or 15-second flood icing, working in a zigzag. Nudge it into corners with a scribe tool and tap the cookie on the counter to level it. Pop bubbles while it is wet.
Wet-on-wet details
Drop dots or lines of a second flood color onto the wet flood and drag a scribe through for hearts, marbling or plaid. Everything dries into one smooth surface.
Dry, then detail
Let the flood set at least an hour, then pipe medium-consistency lettering, lace or borders on top. Details on wet flood sink; details on dry flood stand proud.
Six Royal Icing Variations
Different base, different flavor, same method. Tap a tab:
Meringue powder (the recipe above)
The most reliable base: stable, no raw egg, keeps for two weeks. Use it for anything that will be stacked, bagged or shipped.
Pasteurized egg whites
Replace the meringue powder and water with 3 pasteurized egg whites per 4 cups of sugar and beat to stiff peaks the same way. Slightly glossier and softer; use within 2 days and keep refrigerated. Pasteurized cartons only, never raw shell eggs for icing that will not be baked.
Aquafaba (vegan)
Use 6 tablespoons of liquid from a can of chickpeas per 4 cups of sugar in place of the meringue powder and water. Beat 6 to 8 minutes; it whips slower. Sets firm, flavor is neutral, and nobody can tell.
Without meringue powder
Powdered sugar, milk and corn syrup make a glaze that hardens glossy and works for outlining and simple flooding, though it never sets as hard. Our royal icing without meringue powder recipe has the full method.
Lemon royal icing
Replace the extract with 1 teaspoon fresh lemon juice per 4 cups of sugar and add the zest of half a lemon to the flood icing. Bright, less sweet, and a favorite on shortbread.
Chocolate royal icing
Whisk 3 tablespoons of cocoa powder into the sifted sugar before beating and add an extra tablespoon of water. Pipes and floods the same; dries a deep matte brown that looks like gingerbread.
How to Color Royal Icing (and How Long It Takes to Dry)
Gel coloring only, and remember that every color darkens as it dries. Stop one shade lighter than you want:
| Shade | How much gel | Note |
|---|---|---|
| ShadePastels | How much gelA toothpick dip of gel per cup | NoteStir in and use right away |
| ShadeBright colors | How much gel¼ tsp gel per cup | NoteColors deepen as they dry; stop one shade light |
| ShadeRed, black, navy | How much gel½ to 1 tsp gel per cup | NoteMix the day before; they darken overnight |
| ShadeTrue white | How much gelA drop of white gel | NoteCancels the ivory from vanilla or corn syrup |
| ShadeBrown | How much gelCocoa powder instead of gel | NoteTastes better and never bleeds |
Royal Icing Drying Times
| Stage | Time | Note |
|---|---|---|
| StageTouch-dry (no smudges) | Time45 minutes to 1 hour | NoteAdd details after this point |
| StageFully set | Time6 to 8 hours | NoteSafe to move and plate |
| StageStack, bag or ship | Time24 hours | NoteLonger in humid weather |
| StageHumid kitchen | TimeAdd 50 percent to every time | NoteA fan on low speeds it up; the oven light does too |
How to Store Royal Icing and Decorated Cookies
Royal icing crusts the moment air touches it, so every container gets plastic wrap pressed onto the surface. Then it keeps like this:
| What | How | How long |
|---|---|---|
| WhatStiff icing, uncolored | HowAirtight, surface covered with plastic wrap, room temperature | How longUp to 2 weeks; re-beat before using |
| WhatColored or thinned icing | HowAirtight, in the fridge | How longUp to 1 week; stir and re-thin |
| WhatIcing in piping bags | HowTips wrapped in a damp towel, in the fridge | How longUp to 3 days |
| WhatFrozen icing | HowAirtight container | How longUp to 3 months; thaw and re-beat |
| WhatDecorated cookies | HowSingle layer, airtight, room temperature | How longUp to 1 week; 2 weeks for shortbread |
Troubleshooting Royal Icing
| Problem | Likely cause | Fix |
|---|---|---|
| ProblemColors bleed into each other | Likely causeFlood too thin, or details piped onto wet flood | FixUse 15-second flood; let the base dry 1 hour before details |
| ProblemCraters in the flood | Likely causeThin icing over a large area, or over-mixed with air | FixUse 15-second flood on big cookies; stir, do not whip, when thinning |
| ProblemAir bubbles | Likely causeWhipped on high after thinning | FixThin on low speed or by hand; let the bowl rest 10 minutes; pop bubbles with a scribe |
| ProblemDull or chalky finish | Likely causeDried too slowly, or no corn syrup | FixAdd the corn syrup; dry with a fan on low |
| ProblemIcing will not harden | Likely causeToo much water, or humidity | FixThicken with sifted sugar; run a fan; give it 24 hours |
| ProblemGrainy icing | Likely causeUnsifted sugar or old meringue powder | FixSift everything; replace meringue powder older than a year |
| ProblemOutline breaks while piping | Likely causeIcing too stiff, or a clogged tip | FixAdd a few drops of water; clear the tip with a pin |
Cookies to Decorate with Royal Icing

A finished set: flooded, detailed and ready to box.
Royal icing needs a flat, sturdy cookie that does not spread. These are the ones that work, and most are already on the site:
Classic cut-out sugar cookies
The canvas royal icing was made for: flat, no-spread and sturdy. Our chewy vanilla sugar cookie recipe holds its shape in the oven.
Gluten-free cut-outs
A gluten-free dough that cuts cleanly and does not crumble under a flood. See the gluten-free cut-out sugar cookies.
Gingerbread
Royal icing is the mortar for houses and the piping for gingerbread people. The gingerbread icing recipe is the stiff-consistency version.
Decorated shortbread
Butter-rich and sturdy, shortbread takes a flood beautifully and keeps for two weeks once iced.
A simpler glaze
For cookies that only need a shiny coat, not piping, the easy sugar cookie icing hardens glossy with no meringue powder.
Themed sets
Golf balls, hearts, pumpkins, snowflakes: a set of six shapes in three colors reads as a bakery box. Our decorated golf cookies walk through a full themed set.
Tools Worth Having
A stand or hand mixer, a fine sieve, small bowls with lids, piping bags with number 1, 2 and 3 round tips, a couple of squeeze bottles for flood icing, a scribe tool or toothpicks, gel colors in white, pink, green and black, and a cooling rack to dry the cookies on. Nothing specialist beyond the tips.
Nutrition (approximate, icing on one cookie)
Estimates for the icing on one 3-inch cookie from the 24-cookie batch. Gluten-free, nut-free and fat-free as written; use clear or alcohol-free vanilla in place of almond extract for nut allergies.
Royal Icing Recipe: FAQs
What is royal icing made of?
Powdered sugar, meringue powder and water, with a little extract for flavor and an optional teaspoon of corn syrup for shine. Meringue powder is dried pasteurized egg white, which is what makes the icing whip up glossy and dry hard.
What is the right consistency for royal icing?
It depends on the job. Stiff icing holds a standing peak and is for flowers and gluing. Medium icing holds a soft curled peak and is for outlines and details. Flood icing is thinned until a knife line drawn through it disappears in 10 to 15 seconds, and is for filling in the cookie. The guide above shows how much water each one takes.
How do you do the 10-second test for flood icing?
Drag a knife or spoon through the surface of the icing and count. If the line closes and the surface is smooth again in 10 seconds, it is ready for flooding large cookies. If it closes in 15 seconds, it is right for small or detailed cookies. If it takes longer, add water a few drops at a time; if it closes faster, stir in a spoon of sifted sugar.
How long does royal icing take to dry?
About an hour to be touch-dry, 6 to 8 hours to set fully and 24 hours before cookies can be stacked, bagged or shipped. Humidity slows every stage, so allow extra time in summer and run a fan on low if you are in a hurry.
Can I make royal icing without meringue powder?
Yes. Pasteurized egg whites or aquafaba, the liquid from a can of chickpeas, both whip into a royal icing that sets. A powdered sugar, milk and corn syrup glaze also hardens glossy for simple cookies, though it never sets as hard as true royal icing. All three are in the variations above.
Why is my royal icing not hardening?
Too much water or too much humidity. Thicken it with a spoonful of sifted powdered sugar, give the cookies 24 hours, and dry them under a fan on low. Very old meringue powder also loses its setting power; replace it after a year.
Why do my colors bleed?
The flood was too thin, or a second color was piped onto a flood that was still wet. Use 15-second flood for anything with multiple colors, let each section dry at least an hour before piping next to it, and avoid liquid food coloring, which thins the icing.
How do I get deep red or black royal icing?
Use gel coloring, start with half a teaspoon per cup and mix the icing the day before. Red and black darken dramatically overnight, so what looks pink or grey at first becomes true red or black by morning. A pinch of cocoa in black icing helps too.
Can I make royal icing ahead of time?
Yes. Uncolored stiff icing keeps for 2 weeks in an airtight container at room temperature with plastic wrap pressed onto the surface. Re-beat it for a minute before using. Colored or thinned icing keeps for a week in the fridge; stir and re-thin before piping.
Does royal icing taste good?
It is sweet and crisp, like the shell on a candy. Clear vanilla or almond extract gives it flavor, a teaspoon of corn syrup softens the bite, and lemon juice in place of the extract cuts the sweetness. Most of the flavor on a decorated cookie still comes from the cookie.
How thick should the icing be for gingerbread houses?
Stiff consistency, straight from the mixer, with no extra water. It should hold a standing peak and act as mortar. Pipe it with a number 3 or 4 tip and hold the walls for a minute while it grabs.
Can I freeze decorated cookies?
Yes, once the icing has set for 24 hours. Freeze them in a single layer, then stack with parchment between layers in an airtight container for up to 3 months. Thaw them in the closed container so condensation forms on the box, not on the icing.
How much royal icing do I need for 24 cookies?
The 24-cookie batch above, made with 4 cups of powdered sugar, covers two dozen 3-inch cookies with an outline, a flood and simple details, with a little to spare. Heavily decorated or larger cookies need the 36-cookie batch.
Is royal icing gluten-free, nut-free and halal?
Yes as written. Powdered sugar, meringue powder and water contain no gluten or nuts; use clear vanilla or alcohol-free vanilla rather than almond extract if nuts are a concern, and check that the meringue powder lists no alcohol-based flavoring. The gluten-free cut-out cookies above pair with it.
Save the pin so the consistency guide is one tap away on decorating day.
More Icings, Frostings and Cookies
The cookies to decorate and the glazes and frostings for everything else.
Easy Sugar Cookie Icing That Hardens Glossy
No meringue powder, no piping skills needed. Get the recipe → The CookieChewy Vanilla Sugar Cookie Recipe
The cut-out base that does not spread. Bake a batch → Gluten-FreeGluten-Free Cut-Out Sugar Cookies
Cuts clean and holds a flood. See the recipe → GingerbreadGingerbread Icing for Houses
The stiff mortar version. Build a house → No Meringue PowderRoyal Icing Without Meringue Powder
Three ways to make it from the pantry. See the swaps → Soft FrostingPipeable Cream Cheese Buttercream
For cakes and cupcakes instead of cookies. Make it →Sift, beat to stiff peaks, thin with water a half-teaspoon at a time, outline, flood and let it dry overnight. That is the whole craft, and this royal icing recipe is the base for all of it.
Pin it so the consistency guide is there for every holiday, birthday and bake sale.

